If you have spent any time researching Proxmox, you have probably noticed there is no shortage of installation guides, most of them walking through the installer one screen at a time. By the time you have watched a few, you may know which button to click next, but still have several browser tabs open because you are trying to understand the decisions the installer expects you to make along the way.
For me, the installation was never the difficult part — Proxmox guides you through it well. The time-consuming part was stopping every few minutes to work out what the installer was asking for, whether I was making the right decision, and how that decision would affect everything I built afterward.
Looking back, a handful of topics consistently interrupted the process:
- Understanding the network configuration screen and knowing what to enter for the management address, gateway, and DNS server.
- Understanding why Proxmox displayed a subscription warning after the first login and how to use the No-Subscription repository.
- Deciding whether Docker should run on the Proxmox host, inside an LXC container, or inside a virtual machine.
- Learning the difference between snapshots and backups, when to use each one, and why a healthy home lab needs both.
None of those questions prevented me from installing Proxmox, but each one sent me away to search for an answer. The installation itself took only a few minutes. Understanding the decisions behind it took much longer.
This is the installation guide I wish I’d found: one that covers the same ground as the others — the network screen, the repository setup, where Docker should live, snapshots and backups — but explains the decision behind each step instead of just the click. The Proxmox VE documentation and plenty of videos already show you where to click; what’s harder to find is someone walking through why, and that’s what the rest of this covers.
Understand the Network Screen Before You Reach It
The network configuration screen is one of the first places a beginner is likely to pause. The installer asks for a management address, gateway, and DNS server, but those fields are not three unrelated questions. Together, they tell the Proxmox host where it lives on your local network and how it reaches everything beyond that network.
This guide assumes Proxmox VE 9, the current release as of this writing, based on Debian 13 (“trixie”). The VE 9 installer asks you to select the management interface, enter a hostname, and provide the same three network values discussed here: management address, gateway, and DNS server. If you’re installing on an existing Proxmox VE 8 box, these three values still mean the same thing — the only place version matters later in this article is the repository file format, and that’s called out where it comes up.
The easiest way to make this screen uneventful is to collect the values before you boot the installer. Use a computer that is already connected to the same network where the server will live. If the server will be on a separate VLAN, the values must come from that VLAN rather than from your everyday Wi-Fi network.
The management address
The management address is the permanent IP address you will use to open the Proxmox web interface, connect over SSH, and allow other systems to reach the host. A laptop can move around and accept a different address from the router occasionally. A server is much easier to manage when its address does not change.
Start by signing in to your router and locating its LAN or DHCP settings. You are looking for three pieces of information: the router’s own LAN address, the subnet mask, and the range of addresses its DHCP server automatically hands out.
A typical home network might look like this:
Router address:    192.168.1.1
Subnet mask:       255.255.255.0
DHCP start:        192.168.1.100
DHCP end:          192.168.1.199
In that example, the router may assign any address from .100 through .199 to another device. You could reserve an address for Proxmox in the router, or choose a manually managed address outside that pool, such as 192.168.1.25. What matters is that the address belongs to the correct subnet, is not already in use, and will not later be handed to another device.
Do not blindly copy 192.168.1.25 — it is only an example. Your network may use 192.168.0.x, 10.0.0.x, or something else entirely, and picking an address from the wrong subnet will leave the server installed but unreachable.
Proxmox asks for the address in CIDR notation. With the common subnet mask 255.255.255.0, the value would be:
192.168.1.25/24The /24 describes the subnet mask; it is not part of the host’s IP address. Most home networks use /24, but you should confirm rather than assume. On Windows, ipconfig displays the subnet mask. On Linux, ip address displays the current address with its CIDR prefix. On macOS, ifconfig shows the mask in hexadecimal, so the router’s LAN settings are usually easier to read.
Before committing to the address, check that it is unused. A failed ping does not prove that an address is free because devices can ignore ping requests, so the router’s client and reservation lists are the better source of truth.
After installation, confirm the address actually took by running this on the Proxmox host itself:
ip -4 addr show vmbr0vmbr0 is the bridge the installer creates by default — the physical NIC becomes a port on it, and the bridge is what actually holds the IP address. The output should show the exact address and /24 you entered during setup.
The gateway
The default gateway is the device that receives traffic intended for somewhere outside the local subnet. In a typical home network, that device is the router. If the Proxmox host needs to download an update from the Internet, it sends the packet to the gateway because the destination is not local.
You can find the current gateway from another computer on the same network. On Windows, run:
ipconfigLook for Default Gateway under the network adapter that is actually connected. On Linux, run:
ip route show defaultOn macOS, run:
route -n get default | grep gatewayIf the output reports 192.168.1.1, that is normally the gateway you will enter during installation. The important qualification is on the same network. If Proxmox will live on a dedicated server VLAN, use that VLAN’s gateway, not the gateway reported by a laptop connected to a different network.
The DNS server
DNS translates names such as download.proxmox.com into IP addresses. The Proxmox host can communicate with devices by IP address without it, but package updates and most services become inconvenient or fail when name resolution is broken.
For a first installation, I usually use the router’s LAN address as the DNS server. That keeps local name resolution and upstream DNS behavior in one place. If the router is 192.168.1.1, the DNS field would also be 192.168.1.1.
A public resolver such as Cloudflare (1.1.1.1) or Google (8.8.8.8) can also work, but it is not automatically better. A public resolver may bypass local DNS records created by your router, and networks that deliberately filter or redirect DNS may not allow it. If you already run Pi-hole, AdGuard Home, or another internal resolver, you can use that address, but think about the dependency you are creating: if that DNS service runs as a guest on this same Proxmox host, name resolution may disappear while the host is restarting. For a first server, the router is the least surprising choice.
After installation, test the two halves of connectivity separately:
ping -c 3 1.1.1.1
ping -c 3 download.proxmox.com
If the first command works and the second does not, the route to the Internet is probably fine and DNS is the likely problem. If neither works, inspect the address, subnet, gateway, physical connection, and VLAN configuration before changing DNS at random.
Once these fields make sense, the network screen stops feeling like a quiz. It is simply a description of where the server lives and how it communicates.
The Subscription Message Is Not an Activation Error
After the first login, you’ll see this:
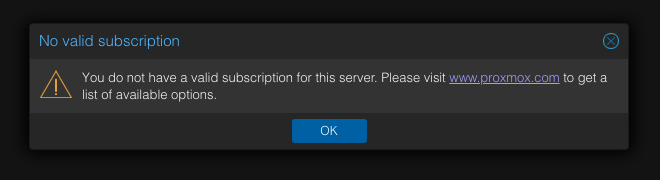
That message is easy to mistake for a licensing or activation failure. It is neither. Proxmox VE is open-source software and remains functional without a paid subscription. A subscription provides access to the Enterprise repository and commercial support.
The distinction is about package repositories. Proxmox recommends the Enterprise repository as its most stable channel for subscription customers, and describes the freely accessible No-Subscription repository as suitable for testing and non-production use. That tradeoff is usually acceptable in a home lab; it should not be silently carried into a business production environment. The current definitions and examples are in the Proxmox VE package repository documentation.
I prefer to make the change in the configuration files. The web interface can manage repositories too, but reading the files makes it clear which channel APT is actually using and avoids depending on the layout of a particular Proxmox release.
Confirm you’re on Proxmox VE 9 before continuing — the file format below is specific to it. Run:
pveversionProxmox VE 9 is based on Debian 13 (“trixie”) and uses the deb822 repository format shown below. If pveversion reports 8.x instead, the repository file is a one-line .list file rather than a .sources file: use /etc/apt/sources.list.d/pve-enterprise.list and pve-no-subscription.list, with bookworm in place of trixie in every line below, and skip the deb822 syntax entirely. The fields mean the same thing either way — only the file format changes.
First, inspect the existing configuration rather than assuming its filename:
grep -R --line-number --no-messages \
  -E 'enterprise\.proxmox\.com|download\.proxmox\.com' \
  /etc/apt/sources.list /etc/apt/sources.list.d/
A fresh Proxmox VE 9 installation uses the deb822 repository format. The Enterprise entry is stored in:
/etc/apt/sources.list.d/pve-enterprise.sourcesOpen it with the editor you are comfortable using:
vim /etc/apt/sources.list.d/pve-enterprise.sourcesIts active stanza will look similar to this:
Types: deb
URIs: https://enterprise.proxmox.com/debian/pve
Suites: trixie
Components: pve-enterprise
Signed-By: /usr/share/keyrings/proxmox-archive-keyring.gpg
Comment each active line so APT no longer reads the stanza:
# Types: deb
# URIs: https://enterprise.proxmox.com/debian/pve
# Suites: trixie
# Components: pve-enterprise
# Signed-By: /usr/share/keyrings/proxmox-archive-keyring.gpg
Then create the No-Subscription file:
vim /etc/apt/sources.list.d/proxmox.sourcesAdd the Proxmox VE 9 stanza documented by Proxmox:
Types: deb
URIs: http://download.proxmox.com/debian/pve
Suites: trixie
Components: pve-no-subscription
Signed-By: /usr/share/keyrings/proxmox-archive-keyring.gpg
If you’re on Proxmox VE 8, don’t copy the block above verbatim — see the note under pveversion further up for the equivalent one-line bookworm format.
With the files saved, refresh the package index:
apt updateRead the output before moving on. If APT still reports an authorization error from enterprise.proxmox.com, another active Enterprise entry remains somewhere under /etc/apt. Run the earlier grep command again and find it. If the update completes cleanly, install the available upgrades:
apt full-upgradeI deliberately omit -y here. On a virtualization host, I want to read the proposed changes before approving them. If the upgrade installs a new kernel or tells you a reboot is required, schedule that reboot before you begin building guests.
Keep the Proxmox Host Boring
One of the most useful decisions I made after rebuilding my environment a few times was deciding what belongs on the Proxmox host. My answer is almost nothing beyond Proxmox, its drivers, and the small number of tools required to manage the machine.
The host is the foundation beneath every virtual machine and container, and installing application stacks directly on it blurs that foundation. Docker adds its own daemon, networks, firewall rules, storage, and update cycle; media servers and home-automation tools add their own packages and dependencies on top. When something breaks, the boundary between hypervisor and application stops being obvious.
Keeping the host clean gives me a smaller failure surface and a simpler recovery story:
- I can update Proxmox without wondering whether a host package belongs to an application.
- I can replace or restore an application guest without modifying the hypervisor.
- If I ever have to rebuild the node, the host remains a reproducible layer rather than a one-of-a-kind server whose configuration I have slowly forgotten.
This is not an argument that Debian is incapable of running ordinary applications. Proxmox is built on Debian, and it can. The point is operational separation: the fact that software can run on the host does not mean the host is the best place for it.
Why I Put Docker in a Dedicated LXC
This is where preference needs to be separated from official guidance. Proxmox recommends running application containers such as Docker inside a QEMU virtual machine. A VM provides stronger isolation because it has its own kernel, and it supports capabilities such as live migration that a nested Docker workload inside LXC does not provide in the same way. Proxmox states this directly in its Linux container documentation.
For an exposed service, an untrusted workload, a multi-user environment, or a system where isolation matters more than overhead, I would follow that recommendation and use a VM. Claiming that Docker always belongs in LXC would be misleading.
In my home lab, however, I use a dedicated, unprivileged Debian LXC for trusted Docker workloads. It consumes fewer resources than a full VM, starts quickly, and remains a first-class guest I can snapshot, back up, and rebuild independently from the Proxmox host — the separation I care about, without a second full guest kernel. That is a tradeoff, not a universal rule.
The starting container does not need to be elaborate. Two CPU cores, 4 GB of memory, and 20–32 GB of root storage are reasonable for a small group of services, but they are not magic numbers. Monitor actual use and resize deliberately. Put persistent application data somewhere included in your backup design rather than assuming the container’s root disk will remain sufficient forever.
I also begin with an unprivileged container, and nesting is the feature every one of my Docker-in-LXC guests actually has set — nested container operation depends on it. Proxmox’s documentation also lists keyctl as a requirement for Docker in an unprivileged LXC; in practice none of my own containers have needed it, so treat it as something to add if you hit a kernel-keyring permission error rather than a guaranteed requirement. Either way, both features weaken some of the default separation: Proxmox notes that nesting exposes parts of the host’s /proc and /sys to the guest. That is another reason not to treat Docker-in-LXC as equivalent to a VM.
After creating the Debian container, stop it and enable nesting in Options → Features, or set it from the Proxmox host. Replace 101 with the container’s actual ID:
pct set 101 --features nesting=1
pct config 101
Here’s the confirmed config on one of my own containers:
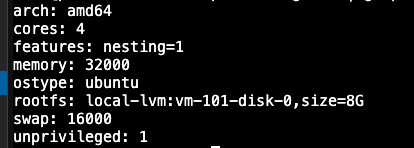
If Docker refuses to start afterward with a keyring-related permission error, that’s the moment to add keyctl too: pct set 101 --features nesting=1,keyctl=1.
One caveat before you continue: keyctl and nesting are necessary but not always sufficient. If your Proxmox storage is ZFS, Docker’s overlay2 driver can still fail to start even with both features enabled — the next thing to check in that case is AppArmor, since some storage and kernel combinations also need lxc.apparmor.profile: unconfined set on the container. That’s a deeper troubleshooting path than this article covers; treat it as a pointer, not a solved problem, if you hit it.
Start the container, update Debian, and only then install Docker using Docker’s current instructions for that Debian release:
pct start 101
pct enter 101
apt update
apt full-upgrade
I would stop here before installing a dozen applications. At this point the important architecture is in place: Proxmox manages virtualization, the LXC owns the Docker runtime, and the applications will live below that boundary. Docker installation and application deployment deserve their own guide because rushing them into this one would turn a useful foundation article into another oversized checklist.
There is one backup detail to settle before adding data. Proxmox can include storage-backed LXC mount points in backups when their backup option is enabled. Bind mounts and device mounts are not backed up as guest data by vzdump; only their configuration is preserved. If Docker stores important data on a bind-mounted host directory or on NFS, that data needs its own backup plan. The Proxmox container backup documentation explains this distinction.
A Snapshot Is Not a Backup
Snapshots and backups are often discussed together because both can help you recover from a mistake. That similarity is also what makes them easy to confuse.
A snapshot records a guest’s state at a point in time on snapshot-capable storage. It is excellent for short-term rollback. Before a major upgrade, a configuration change, or the first Docker installation, I take a snapshot with a meaningful name such as before-docker-install and a note explaining why it exists. If the change goes badly, I can roll the guest back quickly. From the Proxmox host, that looks like this — replace 101 with the container’s actual ID:
pct snapshot 101 before-docker-install --description "Before first Docker install"The same idea applies to VMs with qm snapshot in place of pct snapshot.
The snapshot still depends on the original Proxmox host and its storage. If that storage device fails, the snapshot usually fails with it. Snapshots also consume space as data changes and can quietly become permanent clutter. I treat them as temporary safety points, test the change, and delete them after I am satisfied that the guest is healthy.
A backup is a separate recovery artifact. Proxmox VE can create vzdump backups to storage configured for backup content, or it can send backups to Proxmox Backup Server. A useful backup lives on storage that does not share the same single point of failure as the guest. A backup written to another directory on the same physical disk may protect against a bad guest change, but it does not protect against that disk dying.
The practical setup begins under Datacenter → Storage. Add the destination that will hold backups—commonly NFS, CIFS, a dedicated directory storage, or Proxmox Backup Server—and ensure the VZDump backup file content type is enabled where applicable. Then open Datacenter → Backup, add a scheduled job, choose the node and guests, select the backup storage, set a schedule, and configure retention. Once it’s saved, the job list looks like this:

Before you wait for the schedule to fire, it’s worth triggering one manually to confirm the destination actually works. From the Proxmox host:
vzdump 101 --storage backup-nas --mode snapshot --compress zstdIf that finishes clean, the scheduled job will too — you’ve just tested the storage target without waiting a day for the cron job to run.
For a small home lab, a defensible starting policy might be a nightly backup with seven daily copies and four weekly copies. That is an example, not a law. The correct schedule depends on how much work you are willing to lose, how quickly the data changes, and how much storage you have. A photo library and a disposable test container should not automatically receive the same policy.
Use snapshot mode for scheduled backups when the guest and storage support it, because it minimizes downtime. The word snapshot in “snapshot backup mode” does not turn the resulting backup into an ordinary guest snapshot; it describes how Proxmox obtains a consistent view while creating a separate backup archive. Proxmox documents backup modes, scheduling, retention, and restoration in its backup and restore guide.
After the first job runs, confirm that it finished successfully and perform a restore test. A green backup log proves that a job wrote something; it does not prove that you know how to recover it. Restore a non-critical guest using a different, unused ID, start it on an isolated network if necessary, and verify the application and its data. Then document the restore process while it is still fresh.
My working rule is simple: take a snapshot immediately before a risky change, keep scheduled backups on separate storage, and test restoration. The snapshot buys speed when an update goes wrong. The backup provides a path forward when the guest, host, or primary storage is no longer usable.
Build the Foundation Before the Applications
The first Proxmox installation feels more complicated than it is because several unfamiliar decisions arrive at once. Once those decisions are separated and explained, the shape of the system becomes much clearer.
- The management address gives the server a permanent place on the network. The gateway gives it a route beyond that network, and DNS lets it resolve names.
- The repository choice determines which package channel supplies updates.
- Keeping the host clean preserves a boundary between the hypervisor and the applications it runs.
- A dedicated Docker guest makes that boundary practical, whether you choose the stronger isolation of a VM or accept the tradeoffs of an unprivileged LXC.
- Snapshots give you a quick way back from a bad change, while backups give you something to restore when the original system is gone.
That is the foundation I would want before deploying Plex, Immich, Home Assistant, Paperless-ngx, or anything else: verify the host is updated, create the Docker guest you have chosen, take a clean first snapshot, and make sure a real backup destination is ready. Once those pieces are in place, adding applications becomes a repeatable process instead of an experiment performed directly on the server that holds everything together.
That’s also where this series picks up next. Once the foundation is settled, I’ll walk through the actual guests I run on top of it: a Plex media server, a flight-tracking setup for ADS-B data, a media-downloader stack, and a Homepage dashboard that ties all of it together. Each of those posts can assume the network, repository, host/guest boundary, and backup decisions covered here are already made, so they can focus entirely on the application instead of relitigating the foundation.
Want the Experiment-Driven Agile Retrospective Toolkit?
If you’d like the Toolkit, reach out and I’ll send details (what’s included, pricing, and how teams use it). Or subscribe for new posts and updates.